Happy Sunday to all of you! I hope it was peaceful and enjoyable.
I was asked if my craft room always looks so clean (see video below) - and the answer is NO! When I am not working on a video or in the middle of a project, yes it looks like it does in the video. I have a hard time finding things when I'm in the middle of a project, so I make sure tools get put back where they belong and that helps de-clutter my craft table!
I also had a request for a video tutorial for my wire "paper rack." I don't have enough parts to make a video and I really don't want to take apart the units I have, so I thought I'd try explain them a bit better.
I simple had these wire shelving units laying around, not even assembled, so I put them together like they're supposed to be. I had three sets. I think they were originally purchased on clearance for under $5 from Target. The first two are the outer frames, stacked three units high. The shelves are just the shelves or individual squares from the third set. Cable ties are those little plastic ties that you slide through and pull tight. You can purchase them at the hardware store, Wal-mart, just about any place. I used the small size, they're about 6" long. I attached the pieces, or shelves with these cable ties and used 4 cable ties on each side, then cut the excess off the ties. These are very strong and work well for lots of paper or cardstock!
After I got all the shelves in place, because they sit in front of my window, I chose to cut foamboard I purchased at Michael's into pieces and also attached that to the sides and backs of the units with cable ties (I punched holes for the cable ties with my Crop-a-dile) to protect my paper and cardstock from the light.
I hope that helps!
November 28, 2010
November 26, 2010
Craft Studio Tour Video #7
I thought I would share a peek at my craft studio where I do all my creating. I hope you enjoy it and I hope all of you had a wonderful Thanksgiving!
November 25, 2010
Mary's Thank You Card
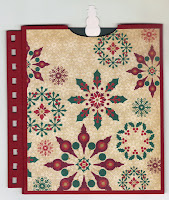
This is a special thank you card for a very special lady - Mary at Cardztv. I sent her a surprise gift for inviting me to participate in her So Many Mini Albums Blog Hop. I had way too much fun working on the project for the blog hop and reading all the comments on my blog! I can't wait until she opens the box because I know she'll be surprised - I can't tell you what it is because she's a follower! This is a Christmas card because her surprise package is Christmas related!

Supply List

Supply List
Thanksgiving Cards - 2010
Here are the Thanksgiving cards we sent for 2010. The two versions just gave me a choice if relatives live in the same town - I can still send the same card, but different colors!
Version 1 in Rich Razzleberry (purple):


Supply List

Version 2 in Cajun Craze (rust):

Supply List
November 19, 2010
Recipe Mini Album Video #6
Here is a simple recipe mini album that holds removable recipe cards. For the supplies needed, click on "Supply List" link below video.
Supply List
Supply List
November 17, 2010
Simple Photo Album Video
Here's a short video of the photo album I made for the cancer fundraiser silent auction. I hope you enjoy it!
Supply List
Supply List
November 14, 2010
BLOG HOP WINNER!
I've used random.org to draw a winner,
and the winner is:
SHANNON
Watch your email Shannon and get back to me soon!
November 13, 2010
So Many Mini Albums Blog Hop!
Welcome to the So Many Mini Albums Blog Hop! I was thrilled and excited when Mary at CardzTV asked me to join her in this blog hop - it's my very first one! Mary is such a special lady to organize a blog hop for mini albums. I'm also taking this opportunity to post my first ever detailed instructional videos!
You should be arriving here from Nicole's Blog, if not, you may want to start at the beginning at Mary's Blog! When you're done with my project, hop on over to Ruthie's Blog. I've included a list of all the blogs (below) in this fun hop, so if you're just joining us, be sure you don't miss the blogs above mine on the list!
Here is the blog list when you're ready to hop on over to the next blog on the So Many Mini Albums Blog Hop:
MARY - http://www.cardztv.blogspot.com/
DREW - http://www.scrappyhappiness.com/
CORRI - http://www.buglvr.blogspot.com/
JANIS - http://www.pausedreamenjoy.blogspot.com/
RAVEN - http://www.love4stamps.blogspot.com/
NICOLE - http://www.primpedinpaper.com/
JENNI - http://www.jenccreationstation.blogspot.com/
(YOU ARE HERE!)
RUTHI - http://www.septemberninth.blogspot.com/
MICHELLE - http://www.mumoftwoblog.blogspot.com/
GALE - http://www.thehappystamper.com/
SUE - http://www.suescraftymess.blogspot.com/
ROXY - http://roxpaperscissors.blogspot.com/
So, let's get started! My project for this blog hop is the "Checking it Twice" Mini Album. It's so named because it's got lots of places for "making a list and checking it twice." Gift lists, guest lists, to do lists, etc. It also has pockets for photos, receipts, and recipes. We're all busy during the holidays and I thought this would be a good way to keep on track and not forget anything (I'm a list maker!). This was so much fun to make and I hope you enjoy it!

 In the posts below are: Two (detailed) Instructional Videos; a Supply List; Cutting Guides; and a Punching Diagram for book rings.
Now I know you all love free goodies, so today, I'm giving away a complete kit to make this "Checking it Twice" Mini Album! Included in the kit is all the chipboard, cardstock, decorative paper, gold cord, book rings, cutting diagrams, and the template you'll need to make this project! (If you choose to use a Bind-it-All, you will need to furnish your own o-wire.)
Here's how to enter:
1. Become a follower or subscribe to my blog (or both!);
2. Leave a comment below this post.
One comment and entry per person, please! Be sure to include a way for me to reach you in your comment! (I prefer an email address - please do not post your blog address as your contact information). I will contact the winner by email for a shipping address. I would hate to have to draw a new winner because I have no way to reach you!
Unfortunately, shipping is limited to the United States and Canada. (If you have trouble posting a comment, please scroll down and try again, sometimes blogger is stubborn!)
GIVEAWAY NOW CLOSED - GOOD LUCK! I will use random.org to choose a winner and contact the winner before noon (eastern time) on Monday, November 15, 2010. I will also post the winner on my blog.
Thanks for joining me, and now, on to my videos! (see posts below!)
Supplies
You should be arriving here from Nicole's Blog, if not, you may want to start at the beginning at Mary's Blog! When you're done with my project, hop on over to Ruthie's Blog. I've included a list of all the blogs (below) in this fun hop, so if you're just joining us, be sure you don't miss the blogs above mine on the list!
Here is the blog list when you're ready to hop on over to the next blog on the So Many Mini Albums Blog Hop:
MARY - http://www.cardztv.blogspot.com/
DREW - http://www.scrappyhappiness.com/
CORRI - http://www.buglvr.blogspot.com/
JANIS - http://www.pausedreamenjoy.blogspot.com/
RAVEN - http://www.love4stamps.blogspot.com/
NICOLE - http://www.primpedinpaper.com/
JENNI - http://www.jenccreationstation.blogspot.com/
(YOU ARE HERE!)
RUTHI - http://www.septemberninth.blogspot.com/
MICHELLE - http://www.mumoftwoblog.blogspot.com/
GALE - http://www.thehappystamper.com/
SUE - http://www.suescraftymess.blogspot.com/
ROXY - http://roxpaperscissors.blogspot.com/
So, let's get started! My project for this blog hop is the "Checking it Twice" Mini Album. It's so named because it's got lots of places for "making a list and checking it twice." Gift lists, guest lists, to do lists, etc. It also has pockets for photos, receipts, and recipes. We're all busy during the holidays and I thought this would be a good way to keep on track and not forget anything (I'm a list maker!). This was so much fun to make and I hope you enjoy it!

Pocket Page - Front

Pocket Page - Back

Now I know you all love free goodies, so today, I'm giving away a complete kit to make this "Checking it Twice" Mini Album! Included in the kit is all the chipboard, cardstock, decorative paper, gold cord, book rings, cutting diagrams, and the template you'll need to make this project! (If you choose to use a Bind-it-All, you will need to furnish your own o-wire.)
Here's how to enter:
1. Become a follower or subscribe to my blog (or both!);
2. Leave a comment below this post.
One comment and entry per person, please! Be sure to include a way for me to reach you in your comment! (I prefer an email address - please do not post your blog address as your contact information). I will contact the winner by email for a shipping address. I would hate to have to draw a new winner because I have no way to reach you!
Unfortunately, shipping is limited to the United States and Canada. (If you have trouble posting a comment, please scroll down and try again, sometimes blogger is stubborn!)
GIVEAWAY NOW CLOSED - GOOD LUCK! I will use random.org to choose a winner and contact the winner before noon (eastern time) on Monday, November 15, 2010. I will also post the winner on my blog.
Thanks for joining me, and now, on to my videos! (see posts below!)
Supplies
Supplies - "Checking it Twice" Mini Album
I designed the pages for this mini album so you can use 8-1/2" x 11" cardstock.
COVER:
Chipboard (Cut 2): 6-1/4" x 5-3/4"
Decorative Paper:
Cover Outside: 7-3/4" x 8-1/4" (2 pieces)
Cover Inside Lining: 5-1/2" x 6" (2 pieces)
POCKET PAGES:
(My mini album is made with 6 pocket pages.)
Cardstock:
Back (cut 6): 6-1/2" x 6" (red)
Front (cut 6): 6" x 5" (red)
Back Pocket (cut 6): 4"x6" (red)
Binding Piece (cut 6): 2" x 4" (red)
Large Tag (cut 6): 4-5/8" x 5-3/4" (dark green)
Small Tag (cut 3): 3-1/2" x 4-1/2" (dark green)
Booklet Covers (cut 3): 4-1/2" x 6" (dark green)
Scraps of cardstock for tag pulls (snowmen in my mini album)
(If you following the Cutting Diagram below, you will be able to get the pocket page front, back, and 2 binding pieces out of one piece of cardstock.)
Decorative Paper:
Front (cut 6):4-11/16" x 5-11/16" (this allows 1/8" edge to show)
Back (cut 6): 3-1/2" x 4-11/16" (this allows 1/8" to show)
(this piece actually tucks inside the small pocket)
Plain Paper for Booklets:
6 Pieces of 8-1/2" x 11" Paper (I just used copy paper): cut 4" x 51/2"
Narrow Ribbon or Gold Braid for Booklets:
3 pieces approximately 6" to 8" long
(By using pretty braid or narrow ribbon to tie the pages to the cover of the Booklets, you can replace the pages year to year to re-use your mini album.)
Miscellaneous Supplies:
Glue runner, ATG gun, or good strong liquid glue to adhere your pockets pieces and decorative paper
1/8" Paper Punch (for booklets)
1/4" Paper Punch or Crop-a-dile (for binding - if you are using book rings)
3 Book Rings or Bind-it-all & a 1" o-wire (11 holes)
Scraps of ribbon, each approximately 3-1/2" long for attaching to book rings or Bind-it-All binding for decorating


Pocket Page & Binding Pieces Cutting Guide - "Checking it Twice" Mini Album


November 12, 2010
Thank You!
Thank you every one of you for your kind and caring thoughts. It's been a rough week for all of us. I miss Bill so much!
November 3, 2010
In Memory of Bill
We had very sad news earlier this evening. Our brother-in-law, Bill passed away. We were stunned. Bill's been ill ever since I met him 4 years ago, but that doesn't seem to matter, we are still in shock.
When Gary and I decided to marry, and since my dad had passed away in 1996, I asked Bill to be my "stand-in Dad" and give me away at our wedding. When I asked him, he told Gary to behave, because he might not give me to Gary!
I loved Bill dearly. He was the best brother-in-law, always quick with a smile and loved to tease. I will miss him greatly. Love and prayers to Bill's family and to my husband, Gary, who has known Bill 42 years.
So, I decided to post this picture from our wedding in 2007. It's always been one of my favorites, but now it's even more special to me.

November 1, 2010
New YouTube Channel
name closer to the name of my blog, so here it is!
JensCreationStation
My first video on this new channel will not go up until November 13, 2010, but please be sure to check out my first 3 videos at:
JenCinMT
Thanks!
Subscribe to:
Posts (Atom)